Why Water Heater Tanks Leak and How You Can Troubleshoot
July 14, 2021
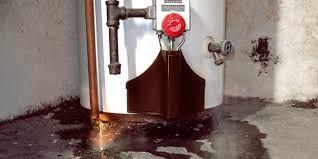
Few things strike immediate fear into the heart of a homeowner, or their wallet, like standing water where it’s not supposed to be. This is especially true if you discover water pooling under your water heater tank. In most cases, these traditional tanks are in a garage, basement, or utility closet in the home. If you discover water coming from your water heater, we recommend contacting your local plumbing professional to properly inspect and repair the issue. Water heater installations involve plumbing and electrical or natural gas connections, and must meet several local and state plumbing, electrical and mechanical codes. It’s for this very reason why Benjamin Franklin Plumbing offers 24/7 rapid response service call scheduling.

Does this mean you’re stuck watching your tank leak until the plumbing cavalry arrives?
Good news…no!
There are steps you can take to troubleshoot what’s wrong and you may even discover it’s not your water tank leaking, after all (but water IS coming from somewhere, so it’s always a good idea to let the professionals keep rolling your way!)
Here’s what you do:
Turn off your tank’s water supply: the two most common valves used in residential water tank installation are ball valves and gate valves.
- Ball valves look like a lever. You pull down or turn the handle to stop the water supply from reaching the tank.
- Gate valves are a wheel design that is turned clockwise to shut off the water. You turn the dial until it stops.
If for some reason your water heater does not have a local shut-off near the tank, you may need to shut off the main water supply to the house. If you suspect the water leak is a slow one, this measure may not be required since shutting off the main water supply to the house stops water from all appliances, sinks, showers, etc. You will need to weigh risk versus inconvenience in the time before the plumbing expert arrives.
If your water heater is powered by electricity, take this important step: locate the breaker to your water heater in the home’s main electrical panel. It should be on a dedicated circuit and labeled accordingly. Once found, turn that breaker OFF.
Now it is safe to take a few more troubleshooting steps:
Let’s start from the top of the tank to the bottom.
Top of tank
- Check the cold water inlet and hot water outlet: these are located on top of the tank. It should be apparent right away if water is dripping out of either of these two contact points. See if the fittings are tight or loose. A loose fitting can be relatively easy to tighten and there are many DIY videos for this online.
- Check the incoming water supply valve: same as the cold and hot water fittings, this is on top of the tank and can become loose or corroded over time. Dripping or standing water around this valve should be easy to see, as well. Sometimes it can simply be tightened, or it needs to be replaced.
Top or side of tank
- Check the T&P relief valve: this stands for temperature and pressure relief valve and they are usually on the top or side of your tank.
(Wait, what does it do? The T&P relief valve is a safety feature required on all water heaters that responds to rising pressure inside the water tank. If the pressure reaches a dangerous level, the T&P relief valve will open automatically and release some of the water. This relieves the pressure and can prevent your tank from bursting. Look for a copper or PVC pipe that runs down the side of your tank and ends near the floor.)
- Inspect the connection point between the T&P relief valve and the tank for water or active dripping at the spot where the valve enters the tank, wherever it’s located on the top or side.
- Inspect the T&P relief valve: If the valve is in the CLOSED position (its lever will appear flipped down) and you see water dripping or leaking from the attached pipe, the valve needs to be replaced and your homes inlet water pressure should be checked ASAP. If the valve is OPEN (its lever will appear flipped up or out), it needs to be flipped to the closed position so it can do its job correctly. The T&P relief valve is mainly opened when the water heater is being “flushed” during maintenance or drained for replacement or winterization.
Bottom of the tank
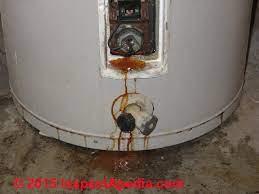
- Inspect the drain valve: this is the larger valve at the bottom that drains the water when repairs or maintenance will take place. First, tighten the drain valve to ensure it is completely CLOSED. If it is closed tightly and you still see moisture leaking out, the valve should be replaced. Additionally, sign of moisture at this spot could also be an indicator of an internal tank leak that needs closer inspection by a professional.
Suspected leaks INSIDE the tank:
The traditional water tank is really a “tank inside a tank”, so to speak. There’s an internal steel tank that is wrapped in an outer layer of insulation and the visible metal skin you can see and touch.
- If internal tank is leaking: you will not see this problem until the water starts to leak from one of the entry or exit points listed above. In most cases, leaking from the internal tank manifests itself at the bottom of the tank. You’ll more than likely see standing water under the tank. The drain valve and T&P valve are the two biggest indicators of internal tank leaks because of their location on the side and bottom of the unit. Moisture around these two valves, provided the fittings themselves are sound, are a red flag the leak is originating in the steel internal tank.
Shouldn’t steel tanks be more durable?
The traditional steel water heater tank is expected to last between 8 and 12 years, on average, according to most manufacturers and plumbing experts. With proper maintenance, some tanks perform safely for almost double that time. However, steel tanks in the best environments will begin to age, corrode, and degrade over the years. City and well water supplies have manmade and organic particles in them that drive this degradation.

What if ALL the valves, fittings, and drains appear intact, but there’s still water underneath?
Then the upside may be your water heater tank is just fine, but a pipe or other water source nearby is leaking water in the area. If you aren’t comfortable or well-versed in inspecting and repairing pipes or other fittings (perhaps on nearby appliances like washers, for example) then let the pros handle it safely and correctly.
Be sure and check out our blog on the Top 8 Most Common Water Heater Problems
As we mentioned, repairing and replacing water heaters also require knowledge of local city, county, and state building codes. Let the insured, bonded, and certified professionals at Ben Franklin Plumbing address your plumbing concerns correctly, safely, and affordably the first time. We’ve been proudly serving customers in Charlotte and the surrounding area for decades, including Indian Trail, Concord, and Mooresville.
Visit http://www.benfranklinplumbing.com or call our 24/7 customer service line today 800.471.0809.